This post shows how to create Dynamic Distribution groups, which might not be used as often as static groups, but in the right circumstance can be extremely useful. Dynamic distribution groups provide a similar service as static distribution groups because they are created to be able to send emails to groups of people using a single group name. However, while static distribution groups add individual recipients to create the group, dynamic groups do not. Dynamic distribution groups create a set of circumstances, or filters, all of which must be met for a person to qualify as a recipient for that distribution group at that time. One important note about dynamic distribution groups is that the recipients are determined based on the set of filters when you use the group. As the group is added to your email all filters are applied and qualified recipients will get the email. Since user information can change at any time, the qualified recipients of a dynamic group can also change at any time.
To Create a Dynamic Distribution Group in Exchange:
- On the Exchange server, open the Exchange Management Console (EMC) and click "Recipient Configuration".
- On the right side in the Action panel, click on "New Dynamic Distribution Group".
- In the New Dynamic Distribution Group Wizard, check the box to specify the organizational unit (OU) you want to include in the group if you want anything other than the default value. Use the Browse button to select the OU you want to be the recipient if you checked the box to specify the OU. Navigate to the appropriate OU and click OK to close the dialog box.

- Type in a name and an Alias for the new distribution group and click next. NOTE: The name should be long enough to make sense to users looking for the group, while the alias should be shortened so users can type it easily if they use the group often. Neither the name or the alias can be longer than 64 characters.
- On the Filter Settings page, select the Recipient Type from either "All recipient types" OR "The following specific types". The following specific types is broken into five categories:
- Users with Exchange mailboxes - Active Directory (AD) users with mailboxes
- Users with External mailboxes - AD users with external email accounts
- Resource mailboxes - mailboxes used for the purpose of managing resources like projectors, meeting rooms, portable tables, laptop carts, etc.
- Contacts with external mailboxes - people with external email accounts that do not belong to AD
- Mail-enabled groups - can be an existing security or distribution group

- On the Conditions page, check the boxes next to the conditions recipients will need to meet to be a part of the distribution group.

- For each condition selected, click on the underlined condition name in the bottom box to set the value for that condition. Once the condition is added, click OK to close the dialog box for the condition values.

- Once the condition values have been set, they are listed in the bottom box. Click next to continue. NOTE: These values must be met exactly as entered so use caution when you are creating them, and when you are entering data for users. Entering data in a consistent format is key for a dynamic distribution group to function as expected.

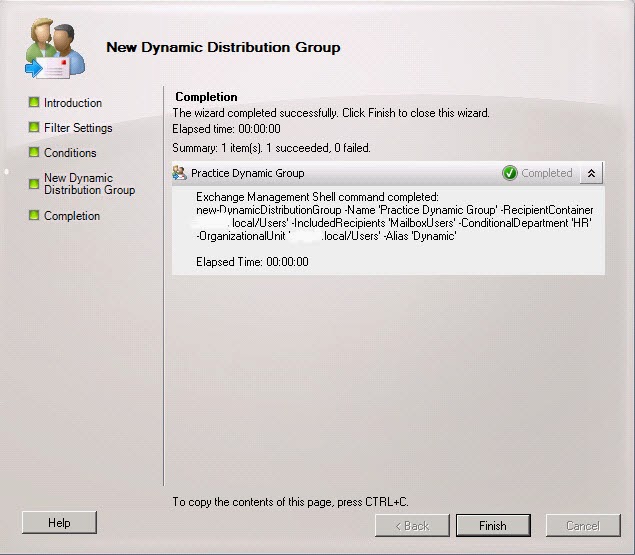
- On the Configuration Summary box, click New after verifying all settings are correct.

- Once the distribution group has been created you should see a completed status next to the distribution group with a green check mark. Click Finish to close the wizard.
To Access the New Distribution Group by Browsing:
- In Outlook, open a new email and click the Browse button.
- Select "Global Address List" from the Address Book drop down menu to get a list of distribution groups on the Exchange server. NOTE: The default Address Book selection is the local user's Outlook Address Book.
- Click on the name of the distribution group in the list, then click the To: button at the bottom to add the distribution group as a recipient and click OK to close.
- Type out the email as usual and click Send when finished. The email will be sent to all recipients in the distribution group.
To Access the New Distribution Group by Alias:
- In Outlook, open a new email and click in the To: field. Type in the Alias for the distribution list. After you have typed the Alias out for the first time, Outlook will show auto-complete for the Alias each subsequent time you start typing the Alias just as it does with previously entered email addresses.
- Type out the email as usual and click Send when finished. The email will be sent to all recipients in the dynamic distribution group at that time.
Both static and dynamic distribution groups can be effective tools for many reasons. Distribution groups allow users on your network to send emails to groups of recipients accurately and quickly. Distribution groups also make sure the correct recipients are in the group and reduce the amount of time required to manage changes to each group. Investing the time it takes initially to create the distribution groups is well worth the effort the longer the groups are in use and the more informed the users on your network are.
Enjoy this post? Subscribe to our Blog
No comments:
Post a Comment