This is where booting into Safe Mode can make a big difference. Booting into safe mode means the device does not start all the services that normally start automatically when you boot into Windows. Instead, only those services necessary for the operating system to run are allowed to start. In essence, with a sluggish device this means the peripheral drivers or programs causing the device to be sluggish are prevented from running. This is especially helpful when unsure of which programs or services may be causing the issue because services can be started one by one to determine which ones need to be removed.
To Enter Safe Mode in Windows 10
- Start the device normally and log in.
- Press the Windows key + X and select "Run" from the pop-up menu.

- In the Run box, type "msconfig" and press enter.

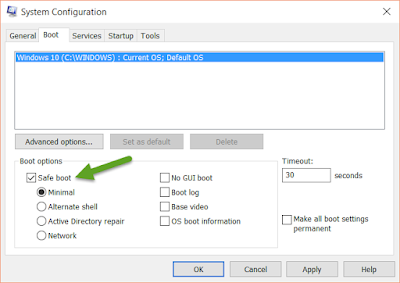
- In the System Configuration window, click on the "Boot" tab.
- Check the box under Boot options for "Safe boot", then click "Apply" and "OK" to close the box.
- In the prompt, click "Restart" to restart the device in Safe Mode.

- Once the device starts, it will be in Safe Mode which can be verified by the "Safe Mode" notice in each corner on the desktop. NOTE: Some applications may display statuses alerting they cannot be started, this is normal when in Safe Mode.

- When finished working in Safe Mode, use the steps below to exit Safe Mode, as a simple restart will restart the device in Safe Mode only.


To Exit Safe Mode in Windows 10
- Once logged into the device, press the Windows key + X and select "Run" from the pop-up menu.
- In the Run box, type "msconfig" and press enter.
- In the System Configuration window, click on the "Boot" tab.
- Uncheck the box under Boot options for "Safe boot", then click "Apply" and "OK" to close the box.

- In the prompt, click "Restart" to restart the device normally.

Windows 10 does not provide an easy way to boot in and out of Safe Mode similar to the way it was done in earlier operating systems. Operating systems with BIOS instead of UEFI allowed quick access to the boot menu simply by pressing F8 when a device was booting and selecting the appropriate option from the boot menu. Once the device was restarted, it booted normally unless a different option was selected upon boot up again. While accessing Safe Mode is a bit more complex now, it is still a useful tool.
As always, knowing how to use more of the features in built-in programs is advantageous!
Enjoy this post? Subscribe to our Blog
No comments:
Post a Comment