Some of the ways a printer might not be responding the way you expect include:
- Failing to print jobs sent to the printer
- Print jobs getting stuck in the print queue
- Pages print as nothing but a mess of characters or symbols
- Printing never occurs but there are never any status messages or errors
- Settings in the printer properties are limited and/or unavailable
A printer that is not operating correctly can be extremely challenging, especially if a backup printer is not readily available. We might not use our printers every day, but when we do, we want them to work correctly so we can get on with our day. Luckily, there is a way to fix these printer issues and it often only takes only 5 - 10 minutes to implement.
The Best Way to Install a Printer can be Manually Downloading the Driver
Before installing the new printer driver
First, write down any important or unique information about the printer. This could include the model number and IP address if it is a wireless or network printer. Also, document any settings unique to this printer such as duplex settings, paper size and type, etc.
Installing the new printer driver
Once the printer information has been documented, remove the printer.
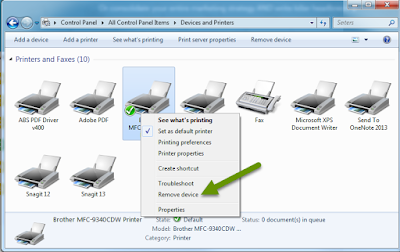
- On a Windows Device, open Control Panel, select Devices & Printers, right-click the device and select "Remove device". When prompted, click the "Yes" button to remove the printer. NOTE: In Windows 10, printers can also be accessed by going to Settings, Printers, but this menu does not provide as many settings as the original printer settings window accessed via the Control Panel.
- On a Mac, open System Preferences, Printers & Scanners, click on the printer to remove and click the minus button at the bottom of the list of printers. When prompted, click the "Delete Printer" button.
Next, install the printer by manually downloading the appropriate driver from the printer manufacturer website.
As always, there are multiple ways to accomplish the same task, but the results can vary greatly!
- Go to the website of the printer manufacturer.
- Navigate to the Support or Downloads section. NOTE: The heading title will vary by vendor.
- Search for the model of the printer or select it using drop-down menus.
- If necessary, select the operating system of your device.
- Download the installer provided. If more than one is listed, select the most recent version matching the operating system.
- Run the downloaded executable to install the printer driver. NOTE: In some instances this will be as simple as selecting "Run" when you download the file. In other instances you will need to open the downloaded folder and find the .exe file to run.
- On a Windows device, enter any requested information during the install such as the IP address or if you want to share the printer.
- On a Mac, after the install, open System Preferences, Printers & Scanners, and select the plus button at the bottom of the list to add the printer. Select the printer from the list of available printers and add any pertinent info including the name and IP address.
- Test printing to the newly installed printer and verify the document printed correctly. If issues remain, verify all settings unique to this printer and your network have been properly configured and try test printing again.
As always, there are multiple ways to accomplish the same task, but the results can vary greatly!
Enjoy this post? Subscribe to our Blog


No comments:
Post a Comment