Trying to maintain multiple copies of the same email distribution group is not effective for many reasons. As an example, say one of the recipients in the group changes their email address and shares it with the person they are most often in contact with in your organization. If the one person in your organization who received the information does not share the updated email address with everyone who needs the update, then whomever was not notified automatically has an email group out of date. People are not normally trying to leave anyone out, but often do not realize many different people use that information and are responsible for the data in their own email groups.
Having multiple people in an organization, even from different departments, using the same email distribution list is common. As an example, if your organization has fundraising events, you would likely have a marketing, communications, or development department(s) in addition to your business department dealing with the same contacts. If each of these departments kept their own distribution groups, some recipients could easily be left off of a group when their email address changes, new recipients to the group might be overlooked, or some people might remain in a group when they asked to be removed from the group. Creating the email distribution group on the Exchange server gives you the ability to keep track of all recipient changes for the group, and more importantly, make the changes a single time. Managing email distribution groups this way saves time, increases efficiency, and ensures accuracy.
To Create a Static Distribution List in Exchange:
- Open the Exchange Management Console (EMC).
- On the right side in the Action panel, click on "New Distribution Group".
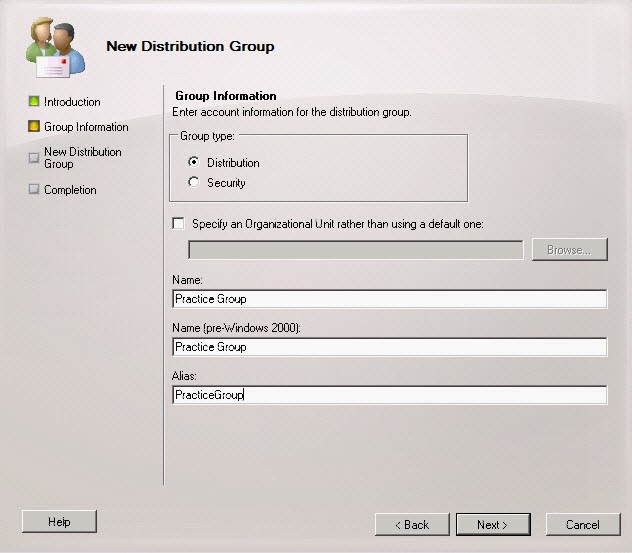
- In the New Distribution Group Wizard, select New Group and click Next.

- Type out the name and alias for the distribution group and click Next. NOTE: The name should be long enough to make sense to anyone looking for the list, while the alias should be shorter so users can type it out if they use the list often rather than browsing to the list. Neither the name or the alias can exceed 64 characters.
- On the configuration summary page, click New after verifying the settings.

- Once the distribution group has been created you will see a completed status next to the distribution list with a green arrow. Click Finish to close the wizard.

To Add Recipients to the Distribution List:
- In the EMC, click to expand the server.
- Click on Recipient Configuration to expand the section.
- Click on Distribution Group to display all distribution lists in the middle pane.
- Double click the name of the new distribution group to open the properties dialog box

- Click the Members tab, then click Add to browse and select recipients.

- Once all members of the distribution group have been added, click OK to close the properties dialog box. NOTE: If you want to add a recipient that is not an internal user and does not have an active directory account on your network, you must create an external contact for them to add them to any distribution group.
To Create an External Contact to Add to a Distribution List
- On the right side of the EMC in the Action panel, click New Mail Contact.
- In the New Mail Contact dialog box, verify New contact is selected and click Next.

- Fill in the name and alias, then click the Edit button next to the email address box at the bottom of the dialog box.
- In the SMTP Address dialog box, type in the email address for the external contact and click OK, then click Next.

- Click New on the configuration summary box after verifying all settings to create the contact.

- Once the new email contact has been created you will see a completed status with a green arrow. Click Finish to close the wizard.
- Once external contacts have been created, they can be added to an email distribution group with the same process used to add internal users.
To Access the New Distribution List by Browsing:
- In Outlook, open an new email and click the Browse button.
- Select Global Address List from the Address Book drop down menu to list distribution groups on the Exchange server. NOTE: The default Address Book selection is the local user's Outlook Address Book.
- Click on the name of the distribution group from the list then click the To: button at the bottom to add the distribution group as a recipient and click OK to close.
- Type out the email as usual and click Send when finished.
To Use the New Distribution List by Alias:
- In Outlook, click in the To: field and type in the Alias of the distribution list.
- Type out the email as usual and click Send when finished.
Email distribution groups can serve many purposes including saving time. Distribution groups save user time since they do not have to type out each individual email address, because user's do not have to remember the appropriate recipients for each type of email, and since updating recipient information is only done in one location. Managing email distribution groups in one location also reduces the probability of errors, omissions, and inaccuracies.
Enjoy this post? Subscribe to our Blog
No comments:
Post a Comment