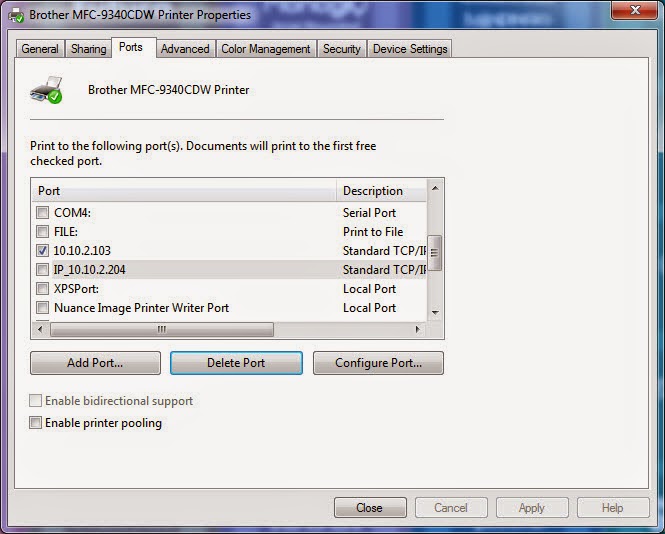
- A different printer port is selected (this often happens when a USB cable is connected directly between the printer and a computer which overrides the existing port)
- The IP address was not statically assigned to the network printer
- The IP address was not saved as a DHCP reservation using the printer's MAC address
- Changes to the network affecting the IP addressing scheme
- Replacement of the network card in the printer
Depending upon the printer, some printer installs can take twenty or thirty minutes not including downloading the installer and running updates. If the selected port is the only issue, adjust the printer port instead of reinstalling the printer. Follow the process below to change the printer port for an existing network printer which can be done in minutes:
- Navigate to the properties of the desired printer and select the "Ports" tab.
- Verify the selected port is the correct IP address for the printer.
- Compare the IP address as the selected port in the Ports tab with the expected IP address.
- If you do not know the IP address the printer is using, print a network configuration page from the printer's interface. This page will list the IP address in use to compare with the IP address for the current port selected.
- If the IP port selected is not the IP port being used by the printer, check the box next to the correct port if it exists in the list of ports.
- If the correct IP port does not exist, create a new IP port to match the IP address the network printer is currently using.
- Click "Add Port" which will open the "Printer Ports" dialog box.
- Select "Standard TCP/IP Port" and click "New Port".
- In the "Add Standard TCP/IP Printer Port Wizard" popup box click "Next".
- Type in the new IP address the printer is using and click "Next". Make sure the numbers are separated by periods exactly as they appear on the printer network configuration page.
- Click "Finish".
- Click "Close" to close the "Printer Ports" dialog box.
- The new IP port will be listed in the Ports tab and be the selected port for the printer.
- Click "Apply" and "Close" to close the printer property dialog box.
- Test print a document from the network printer to be sure everything is now working as expected.

Verifying a printer port is set correctly is an easy way to troubleshoot printer issues. Even though there are many different issues which can arise with network printers, adjusting the IP port is a quick and easy fix when it is the cause of the problem. The process outlined above takes only a few minutes and once completed will allow printing to continue when you run into network printer port issues.
As always, good luck!
Enjoy this post? Subscribe to our Blog


Thanks guys, for sharing this conductive accumulation. clubflyer printing
ReplyDelete