Using editable digital forms is much more efficient compared to a standard document with fields that the user struggles to input information into without the form itself being changed or worse yet, having to print them then scan and email or fax back. Luckily, Adobe Acrobat can automatically insert numerous form fields based on the document format. While not all fields are automatically interpreted to create fields, additional fields like radio buttons and check boxes can be created later and will be discussed in Part II of this post.
Also, we have created a video that compliments this post.
How Adobe Acrobat can Easily Create Editable Digital Forms
Creating editable digital forms is a process that can be quick, however, the actual length of time will be determined by the number of fields in the form.
- Once the form has been created in a document editor, like Microsoft Word, save the file using the Save As option and save it with a .pdf extension.
- Open the new pdf document with Acrobat.
- Using the menu on the right, click Tools to expand the menu then select "Create" under the Forms sub-menu. This starts the automatic field creation process.

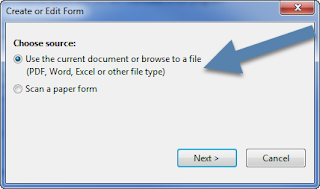
- When prompted for a source to create or edit the form, select "Use the current document or browse to a file" then click Next.
- In the next prompt, click Next to "Use the current document".

- Once the process has finished, the document will include all fields Acrobat could easily determine should be input fields.

- Single line input fields take the name of the field and usually do not need to be modified.
- Larger input fields behave differently as Acrobat reads each line as a new field and therefore creates multiple fields for a single input box.
- This is often not how the input box is designed to be used. A large input box left like this will require the user to tab or click to each new line when reaching the end of a single line. The better option is to turn this into a single field using the steps below.
- Click on a field below the first line.

- Click the delete button to remove these secondary fields, leaving only the first field.
- When only the first field remains, drag the sizing of the field down using the sizing box in the middle of the line to cover all of the lines for the input field.

- Next, enable the multi-line property by checking the box next to "Multi-line" under the Options tab. This allows the cursor to wrap around to the next line at the end of each line as the user types.

- Additionally, the appearance of each field can be modified including changing font size, type, color, borders, and much more.

- Once finished, preview the form or open it in Reader to see how the form looks and behaves for a user.

- Be sure to test each field to make sure they behave the way you expect.
- In general, a font size of 14 works really well on large input fields created in Word.
- Make any necessary adjustments to fields by re-opening the file with Acrobat. You will need to close the document in Reader first.
- Be sure to save the document after making any changes and re-test the fields as a user until all fields behave correctly.


Using Adobe Acrobat to turn regular documents with fields into a form is a process well worth the time. Once created, forms can be used by an unlimited number of users. They can also be saved and submitted without ever needing to be printed or requiring special software to access or complete. One of the greatest benefits of creating a form like this is it allows anyone to use it because Adobe Reader is free to download and use.
In Part II of this post we will show how to add fields that are often not automatically created like radio buttons and check boxes.
As always, finding ways to use technology to save time and resources is rewarding!
No comments:
Post a Comment